📖 Model Commercialization (Use Case)
Use case
One of the most common use cases for MANTA is model commercialization. This involves taking a model that has been trained and is ready for deployment, and making it available to users through our interface. This can be done in different of ways, such as through an API or a web application. The goal is to make it easy for users to access and use the model, while also providing a seamless experience. The following steps will guide you through the process of setting up MANTA for model commercialization, including configuring the environment, setting up the models, configuring theme, setting up the billing, and more.
Step 1: Setting up the Environment
To set up the environment for model commercialization, you will to set up environment variables for your MANTA instance. Here are some of the key environment variables you will need to set:
WEBUI_NAME- This is the name of your MANTA instance, which will be displayed in the user interface. You can choose any name that you like, but it should be something that is easy to remember and reflects the purpose of your MANTA instance. For example, if you are using MANTA to commercialize a model called "Enterprise City", you might set this variable toWEBUI_NAME="Enterprise City".DISPLAY_APP_NAME_IN_HEADER- This variable controls whether the name of your MANTA instance (set byWEBUI_NAME) is displayed in the header of the user interface. If you want to display the name in the header, you should set this variable toDISPLAY_APP_NAME_IN_HEADER=true. If you prefer not to display the name in the header in case you have name already in logo, you can set this variable toDISPLAY_APP_NAME_IN_HEADER=false.PAYMENT_PROVIDER- This is the payment provider that you want to use for your model. MANTA currently supports Stripe as a payment provider, so you should set this variable toPAYMENT_PROVIDER=stripeif you want to use Stripe for payments.STRIPE_PUBLISHABLE_KEY- This is the publishable key from your Stripe account, which is used to process payments for your model and it can be found on your Stripe dashboard.STRIPE_SECRET_KEY- This is the secret key from your Stripe account, which is used to process payments for your model and it can be found on your Stripe dashboard.GLOBAL_CURRENCY- This specifies the currency you want to charge users in for accessing your models. While you can select any Stripe-supported currency, choose one that aligns with your primary user base and the value your service provides. For example, GLOBAL_CURRENCY=USD will process all user payments in US dollars.INVOICE_MIN_AMOUNT- This is the minimum amount for which you want to create an invoice. This can be set to any value that you choose, but it should be set to a value that is reasonable for your model and the value it provides to users. Eg:INVOICE_MIN_AMOUNT=3.50will set the minimum invoice amount to 5 of your preferred currency.INVOICE_OVERDUE_HOURS- This is a number of hours after unsuccessful payment of an invoice the user will be blocked from using the application until the invoice is paid. This can be set to any value that you choose, but it should be set to a value that is reasonable for your model and the value it provides to users. Eg:INVOICE_OVERDUE_HOURS=24will block users with unpaid invoices after 24 hours of the invoice being created.BILLING_CYCLE_TIMEZONE- This parameter applies specifically to 📅 Subscription Only or ⚙️ Hybrid billing. It defines the geographical time zone Manta uses when processing recurring payments. For example, setting BILLING_CYCLE_TIMEZONE=UTC ensures all subscription cycles are anchored to Coordinated Universal Time.BILLING_MODE- This variable controls the billing mode for your models. The guide on choosing your billing mode can be found in the ✅ Billing Modes documentation. For example, if you want to use the Per Token Only billing mode, you should set this variable toBILLING_MODE=HYBRID.EARLY_BILLING_WINDOW- In case you selectedSUBSCRIPTION_ONLYorHYBRIDbilling mode, you can set this variable to the number of days before the end of the billing cycle when users will be charged for the next billing cycle. This can be set to any value that you choose, but it should be set to a value that is reasonable for your model and the value it provides to users. Eg:EARLY_BILLING_WINDOW=3will charge users 3 days before the end of the billing cycle.MIN_DAYS_BEFORE_PRICE_CHANGE- In case you selectedSUBSCRIPTION_ONLYorHYBRIDbilling mode, you can set this variable to the minimum number of days before subscription price change will take effect. All users that are using that subscription will be notified about the upcoming price change that will take effect after the set number of days. This can be set to any value that you choose, but it should be set to a value that is reasonable for your model and the value it provides to users. Eg:MIN_DAYS_BEFORE_PRICE_CHANGE=7will notify users about the upcoming price change 7 days before the price change takes effect.
In order to enable email sending you'll need to configure the following environment variables as well.
SENDER_EMAIL_ADDRESS- The email address that will be used as the sender for all emails sent by MANTA. This should be an email address that you have access to and is associated with your domain.
In case you want to use your own SMTP server for sending emails, you can set the following environment variables:
SMTP_HOSTNAME- The hostname of your SMTP server.SMTP_PORT- The port of your SMTP server.SMTP_USERNAME- The username for your SMTP server.SMTP_PASSWORD- The password for your SMTP server.
Or if you're using AWS SES as your email provider, you can set the following environment variables instead:
AWS_ACCESS_KEY_ID- Your AWS access key ID.AWS_SECRET_ACCESS_KEY- Your AWS secret access key.AWS_REGION- The AWS region where your SES is set up.
Environment Variables Example
WEBUI_NAME="MANTA"
DISPLAY_APP_NAME_IN_HEADER=true

OFFLINE_MODE=false
RAG_EMBEDDING_MODEL_AUTO_UPDATE=false
RAG_RERANKING_MODEL_AUTO_UPDATE=false

# Connection API
ENABLE_OLLAMA_API=false

# User
DEFAULT_USER_ROLE=user

# Chat Permissions:
USER_PERMISSIONS_CHAT_EDIT=false
USER_PERMISSIONS_CHAT_TEMPORARY=false
USER_PERMISSIONS_CHAT_STT=false
USER_PERMISSIONS_CHAT_TTS=false
USER_PERMISSIONS_CHAT_CALL=false
USER_PERMISSIONS_CHAT_MULTIPLE_MODELS=false
USER_PERMISSIONS_CHAT_SYSTEM_PROMPT=false

# Features permissions:
USER_PERMISSIONS_FEATURES_CODE_INTERPRETER=false
USER_PERMISSIONS_FEATURES_WEB_SEARCH=false
USER_PERMISSIONS_FEATURES_IMAGE_GENERATION=false


ENABLE_EVALUATION_ARENA_MODELS=false
ENABLE_MESSAGE_RATING=false
ENABLE_COMMUNITY_SHARING=false

ENABLE_TITLE_GENERATION=true
ENABLE_FOLLOW_UP_GENERATION=false
ENABLE_CODE_EXECUTION=false
ENABLE_CODE_INTERPRETER=false
ENABLE_DIRECT_CONNECTIONS=false
ENABLE_AUTOCOMPLETE_GENERATION=false

ENABLE_API_KEY_ENDPOINT_RESTRICTIONS=true
API_KEY_ALLOWED_ENDPOINTS='/api/models,/api/chat/completions'

SAFE_MODE=true
ENABLE_WEB_SEARCH=false
ENABLE_SEARCH_QUERY_GENERATION=false


# DO NOT TRACK
SCARF_NO_ANALYTICS=true
DO_NOT_TRACK=true
ANONYMIZED_TELEMETRY=false

# Jira integration
JIRA_URL=''
JIRA_PROJECT=''
JIRA_USERNAME=''
JIRA_PASSWORD=''
JIRA_ISSUE_TYPE=''
JIRA_ISSUE_SUMMARY=''

# Billing integration
PAYMENT_PROVIDER=stripe
INVOICE_MIN_AMOUNT=5
INVOICE_OVERDUE_HOURS=2
# Billing cycle timezone (IANA format, e.g. America/New_York)
BILLING_CYCLE_TIMEZONE=UTC
BILLING_MODE=PER_TOKEN_ONLY
GLOBAL_CURRENCY=USD
EARLY_BILLING_WINDOW = 5 # Days before subscription end to attempt renewal
MIN_DAYS_BEFORE_PRICE_CHANGE = 30


# Stripe integration
STRIPE_PUBLISHABLE_KEY=''
STRIPE_SECRET_KEY=''

# ENABLE_LOGIN_FORM must be set to false
# when ENABLE_OAUTH_SIGNUP is true
ENABLE_LOGIN_FORM=false

#OAuth login
ENABLE_OAUTH_SIGNUP=true
OAUTH_CLIENT_ID=''
OAUTH_CLIENT_SECRET=''
# Display name for oidc provider
OAUTH_PROVIDER_NAME=''
OPENID_PROVIDER_URL=''
OPENID_REDIRECT_URI=''
# OAuth OPENID auto redirect, setting this to `true` will redirect users right to oidc provider and skip Manta login page.
OPENID_AUTO_REDIRECT=true


# Notifications
# These values control which notification provider is used and the sender identity.
# Leave them empty to disable the notification service entirely.
NOTIFICATION_PROVIDER=''
SENDER_EMAIL=''

# AWS credentials (used only if AWS is selected as the notification provider)
AWS_REGION=''
AWS_ACCESS_KEY=''
AWS_SECRET_KEY=''

# # SMTP configuration (used only if SMTP is selected as the notification provider)
SMTP_HOSTNAME=''
SMTP_PORT=''
SMTP_USERNAME=''
SMTP_PASSWORD=''
Step 2: Set up your Branding
MANTA allows you to customize the branding of your instance to create a unique and personalized experience for your users. You can customize the logos, colors, and overall theme of your MANTA instance to align with your brand identity. This can be done by following the instructions located in the 🎨 Branding documentation.
Step 3: Set up your Models and Billing
Firstly you need to add a new connection for your model in the Admin Panel under Connections. This will allow you to connect your model to MANTA and make it available for use in chats and other features.
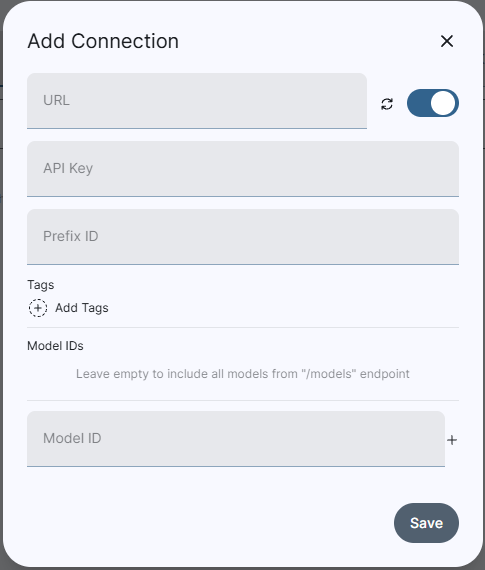
After you have set up your connection, you can configure your model in the Admin Panel under Models. Here you can specify the billing details for your model, such as the price per token - both input and output tokens, the maximum number of tokens allowed per request, model visibility, and more. The recommended settings are as follows:
- Visibility: Set to "Public" if you want the model to be available for all users, or "Private" if you want to restrict access to specific users or groups.
- Token Tracking: Set to Hugging Face Tokenizer if you have model on Hugging Face and want to track token usage based on the Hugging Face Tokenizer, or other options as per your needs.
- Input Token Price per 1M Tokens: Set the price for input tokens. This is the price that users will be charged for each million input tokens processed by the model.
- Output Token Price per 1M Tokens: Set the price for output tokens. This is the price that users will be charged for each million output tokens generated by the model.
- Token Limit per Minute: Set the maximum number of tokens that can be processed by the model per minute. This can help you manage costs and ensure that your model is not overused.
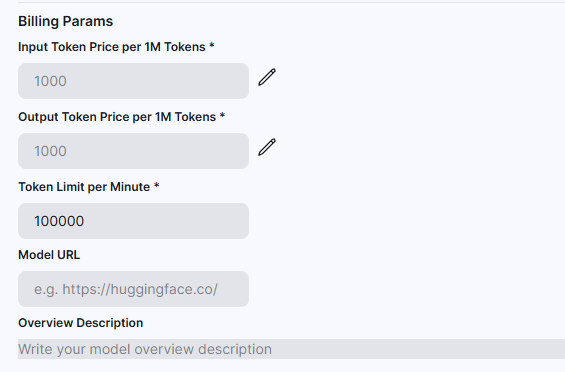
This should be enough to get you started with model commercialization using MANTA. You can further customize your instance and explore additional features as needed to create the best experience for your users.
Step 4: Validate your Setup
After you have completed the above steps, it's important to validate your setup to ensure that everything is working correctly. You can do this by creating a test user and trying to use the model through the user interface. Make sure that the billing is working as expected and that the model is responding correctly to user inputs. If the user can see the list of available models and can successfully use the model in a chat, then your setup is complete and you are ready to commercialize your model with MANTA!